
 Tickets
 Parties
 Shop
Shop Directions
#66 – September Status Report
September 30, 2012
This month’s article is a follow-on to last-month’s Part 65 in which I described some of the pitfalls of flash photography of the EnterTRAINment Junction (EJ) layout. This article looks at the technique of using the available light in the layout to photograph it.
As I mentioned last time, the camera sensor needs a certain amount of light to record the image, that’s either a lot of light in a short period of time or less light for a longer period of time. Exposure times less than about 1/40 of a second can usually yield non-blurry results if the camera is held by a steady hand and the subject of the picture is not moving. Exposure times longer than about 1/30 of a second generally require some kind of mechanical steadying-device (like a tripod, flexible arm camera holder [e.g., Gorillapod ®], or camera clamp.). For this article, I’ll refer to this device as a tripod, since that provides the most options for photographing the layout through and over the transparent barriers surrounding the layout, and it’s the device I’ve used for almost all of the pictures you’ve seen in these articles.
There are two ways that cameras control the amount of light they let in to the recording medium, be it film or the digital camera’s electronic sensor. The first is by controlling the amount of time that the light is let in. That’s the “exposure time.” The second is by controlling the size of the opening through which the light passes, called the “aperture.” It is normally located at the point behind the lens where the light rays cross on the way from the lens to the recording medium. The smaller the opening, the less light is let in. These two controls can either work together to magnify the amount of light controlled or against each other to balance one effect versus the other. We’ll look at exposure time first, because it’s easier to understand.
So, how much exposure time is needed? That depends on the camera’s light sensitivity and the amount of lighting on the subject of the photograph. Since EJ now has a day and dusk lighting cycle as well as spot-lit areas, the exposure time can vary quite a bit. Fortunately, most modern cameras measure the available light and adjust the settings automatically. Figure 1 shows two images of the Modern Yard taken from the EJ mezzanine. The image on the left was taken during the “day” lighting period and took a full second to gather enough light to properly show the scene. The image on the right was taken during the “dusk” period and took almost 3 ½ times as long to get the same level of brightness. Also note in the image on the right that the lights, which produce a fixed amount of light in a given period of time, are much brighter because the camera is getting 3 ½ times as much light from them.
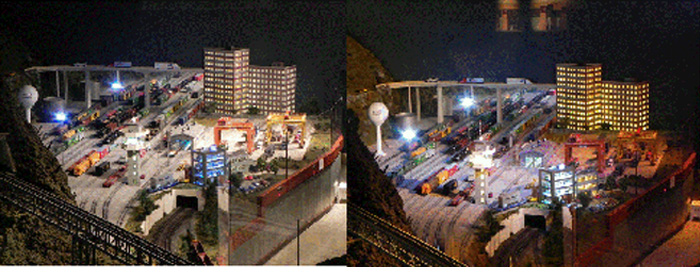
Figure 1. 1.0 Second (Left) versus 3.4 Seconds (Right)
Also note what looks like a window at the top of the image on the right. It isn’t a window at all, but a reflection of the area behind the camera in glass of the windows which surround the mezzanine. Longer exposure times tend to accentuate reflections beyond what you see with your eyes. Such reflections are all too common because of the mezzanine windows and the plexiglass barriers along the aisles. The closer you can get the camera lens to the reflective barrier, the smaller the size of the device you need to block a reflection getting in front of the camera lens. You can use your hand (the side toward the lens not illuminated), or your body (wear a dark shirt), or even a piece of black cardboard to place between the reflective area the camera is looking at and the source of the reflection. Blocking reflections takes a bit of practice, but the results are definitely worth the effort.
The next subject is a bit harder to understand, because its details are not intuitive. That’s the concept of “depth of field,” which is the distance from the camera that the image is in focus. You know from your own eyes that when they adjust their focus on objects close up, objects in the distance are not in focus, and when distant objects are in focus, close objects are not. To increase the distance from the center of focus toward the camera and away from the camera that the image is clear (not blurred), you need to reduce the size to the aperture (remember it’s the opening behind the lens through which the light must pass). As mentioned before, reducing the size of the aperture reduces the amount light the camera lets in. So, if there is only a fixed amount of light available, closing the aperture must be compensated for by letting light in for a longer exposure time. The aperture is also called the f-stop, and the larger the number, the smaller the opening. These f-stop numbers and terminology are part of photographic jargon from the past and are continued in use today, whether or not they make sense to us. Figure 2 shows the difference in clarity. The image on the left was taken with the larger opening than the image on the right. The detail is shown below each wider view. The camera was deliberately focused on the vertical beam at the right. Note that the improvement in clarity in the image on the right even extends to the domed building in the background.

Figure 2. Depth of Field at f4 (1/9 sec) Versus at f8 (1/2 second)
Most fairly sophisticated automated cameras today have a mode called “aperture priority,” which lets you set the desired aperture (the higher the number, the greater the depth of field) and the camera then adjusts the exposure time to collect enough light to make a proper image. If the camera has a fully manual mode, the user can set both aperture and exposure time, and will have to consider the effects of both to get a good photo.
Now, we have ways to deal with low light (higher exposure time) and to get good depth of field (smaller apertures = higher f-stop number) for static scenes. But, of course, there’s a down-side illustrated in Figure 3: moving objects in a time exposure will be blurry. The streak of the headlights on the locomotive show how far it moved during the 0.91 second exposure. Moving trains are a problem for long-exposure-time photographs, unless you like the motion blur, which can have some artistic benefits.
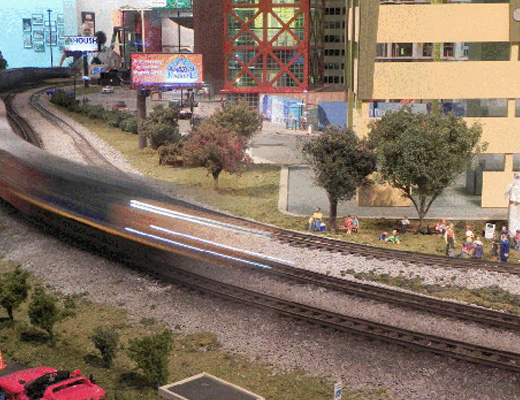
Figure 3. Motion during 0.91 second Exposure
Once the photo is taken, some adjustments can still be made to digital photographs to correct for brightness and color. A fairly extreme example is shown in Figure 4. The left image is very dark as taken during the EJ dusk lighting period, but there was still enough data captured to brighten the image to make it usable.

Figure 4. After-processing by Computer
Now you know how I take most of the photographs that appear in these articles, and why you see very few trains in them. The solution to the moving train problem is, of course, taking pictures of the trains in the scenery when the trains are stopped, as shown in Figure 5. The train is stopped at River Bend to await a passing train. Unfortunately, there are only a few such stops on the layout where the trains a “posed” well for a photograph. Perhaps we can talk the EJ management into increasing the opportunities by adjusting the locations where they stop to wait for clear track ahead.

Figure 5. Catch Them When They Stop
I could speak the heresy and say that it’s the artistry in the layout scenery and details that make it photogenic and that the trains just get in the way of seeing those details, so I don’t need the trains. But, I won’t.
So, if you see me in the aisles with my tripod, you’ll know what I’m up to. Hopefully, you can use the information above to help you with your photographs, and they will turn out to be what you want.
© 2012 Tom Bartsch
MVGRS Big Train Project Coordinator