
 Tickets
 Parties
 Shop
Shop Directions
#67 October Status Report October 28, 2012
October 28, 2012
This month’s article is a follow-on to last-month’s Part 66 in which I mentioned the need for some method to hold the camera steady during the long exposure times I recommended for photographing the EnterTRAINment Junction (EJ) layout. This article looks at some of the devices and methods that can be used to steady the camera.
The first and fairly important consideration is to activate the camera “shutter” so that it doesn’t shake the camera during the exposure. Just pushing on the shutter button on the camera, even when it’s mounted on a tripod, can shake the camera enough to ruin the picture. Some cameras allow the use of a “cable release”, which is normally a flexible mechanical or electrical cable with a shutter button that duplicates what the one on the camera does but isolates the camera from the force applied by the finger pushing the button. My current camera doesn’t have such an input, so I use the camera’s self timer to activate the shutter. Setting a two-second delay is usually enough to allow any movement of the camera, from actuating the timer, to damp out.
The most common device to steady a camera is a tripod. Figure1 shows the tripod I normally use for photographing the layout. Its minimum height is 22 inches. At full extension of the legs, it’s 47 inches high. Narrowing the stance of the legs provides another two inches in height. The center extension raises the height to a maximum of 60 inches. This is close to the height of my eyes and provides a normal eye-level view of the layout.

Figure 1. The Tripod
The normal view of the layout, of course, is most often through the Plexiglas barrier. Sometimes that’s not desirable if reflections get in the way of a good shot. To get around this potential problem for some pictures, I’ve added an extension that gives another 19 inches of height, enough to raise the camera above the top of the barrier (Figure 2). The extension was the crank-up center from an old tripod whose legs were no longer usable. The dark colored tape on the extension is to prevent it from producing any bright reflections in the Plexiglas.
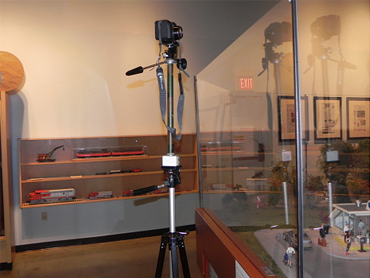
Figure 2. Tripod Extension
Figure 3 shows the simple connection between the main tripod mounting and the extension. It’s a piece of square aluminum tubing with a nut for the tripod screw and threads for attaching the base of the extension.
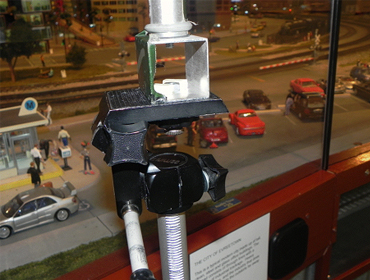
Figure 3. Mounting of the Tripod Extension
Another device that could prove useful for steadying a camera is a flexible-arm mount called a Gorillapod ®. Figure 3 shows it in one of its conventional mounting methods on the railing around the EJ mezzanine. Two of its three arms are bent around the front of the railing and one is bent forward from the rear. Of course, the three legs can also be used extended downward from the camera in the standard tripod arrangement. However, there are few locations at EJ that let you effectively use that configuration because you need to set it on a flat surface in view of the scene you want to photograph.
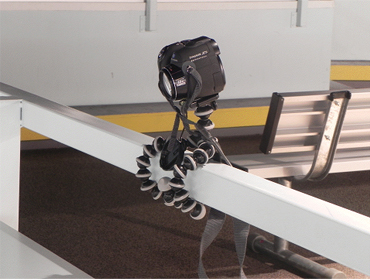
Figure 4. Gorillapod in Conventional Mounting
Using the Gorillapod in a less conventional mounting method on top of the Plexiglas barrier is shown in Figure 5. Needless to say, some care has to be applied to prevent the camera from falling into the layout (e.g., set it so that the center of gravity of the camera-Gorillapod unit is outside the barrier).
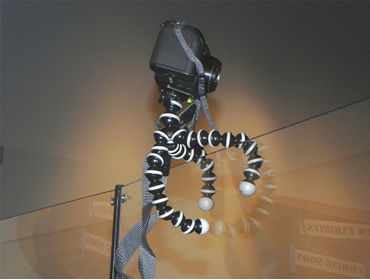
Figure 5. Top-of-Barrier Mounting
With some creativity, you can find may configurations that could be useful. Figure 6 shows a “human-assisted” approach. The two lower legs provide the vertical support, held in place in the corner between the Plexiglas and its mounting frame. The two support points provide a pivot axis, so the third leg is leaned against the Plexiglas and is used to provide that all-important third fixed point needed to set the position of the camera. As always, the greater the separation between the support points, the steadier the hold. Since there is no way for the Gorillapod to grab the Plexiglas at that location, a slight steady push from a hand provides the missing support.
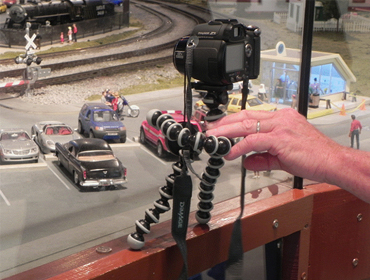
Figure 6. Human-Assisted Mounting
Even though I’ve focused these articles on photographing the EJ layout, you can use some of these techniques any time you need to photograph a subject that has limited light available. Use your creativity and some helpful equipment, and you can get great shots.
I wish you great fun in taking the photographs and great pictures to reward the effort.
© 2012 Tom Bartsch
MVGRS Big Train Project Coordinator